
In the first post of our HubSpot-WordPress Integration Series, we explained three ways that integrating your website with HubSpot creates a powerful web marketing machine for your business.
Here, we take a deeper dive into the first one, explaining how to set up HubSpot analytics on your WordPress website and what you can do with the data.
How to Install HubSpot Analytics on WordPress
Before starting, make sure you meet the requirements for installing the plugin, then follow the six simple steps to analytics installation.
Requirements
Hubspot and WordPress make it super easy to integrate analytics with the HubSpot CRM, Email Marketing, Live Chat, Forms & Analyticsplugin:
- Use WordPress.org (this doesn’t work on WordPress.com)
- Use WordPress version 5.8 or higher (for website security we stress keeping up to date with the latest version)
- Have PHP at version 7.2 or higher
- Are an admin of your WordPress site
Installation Steps
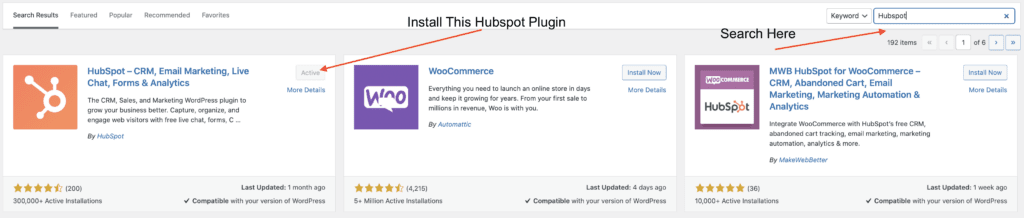
Navigate to Plugins –> Add New –> Search for “Hubspot”
Now that you’re good to go on installing the plugin, here’s how to do it.
Step 1: In your WordPress dashboard, hover over Plugins on the left and click Add New.
Step 2: Search for “HubSpot”
Step 3: Click “Install Now.”
Step 4: Click “Activate Plugin.”
Step 5: In the WordPress dashboard, hover over Settings and click “HubSpot Settings.”
Step 6: Enter your HubSpot Hub ID (found in the top right in your HubSpot account) and save.
That’s it! To make sure your tracking code is installed correctly and working properly, check out this HubSpot analytics help article.
Make Some Marketing Magic!
Now that you have HubSpot analytics integrated with your WordPress website, here are some of the things you can do.
View and Customize Your Marketing Dashboard
The first thing you see when logging into HubSpot is the marketing dashboard. If you’re not yet using forms and landing pages to capture subscribers and leads, you’ll only see the number of visits.
For now, that’s OK. The number of site visits is an important metric to track. You can select a timeframe to view and select a comparison timeframe.
You can also set up your visitor and contact goals to continually check your progress.
HubSpot offers a couple of helpful articles on understanding dashboard metrics and how to set up SMART marketing goals.
Check Your Sources Report
In the navigation bar in your HubSpot account, click Reports and Sources. This takes you to your sources report, where you can see your total visits broken down by source (organic search, referrals, social media and more) to analyze where your website traffic is coming from.
You can analyze visits from a selected timeframe, save reports and even see which traffic sources lead to the most contacts and customers.
Here’s a post on how to master HubSpot’s Sources Report.
Analyze Page Performance
In your HubSpot account, click Reports from the navigation again – this time clicking on Page Performance.
Here, you can see the number of views on each page in a particular timeframe. You can select only blog pages or view data for your whole site.
Also included in the report are the number of tracked keywords each page ranks for, the number of links back to each page and the percent of page views that resulted in CTA clicks.
HubSpot analytics also pulls search engine optimization (SEO) data from each page on your site. To the left of the page name and url, you’ll see an icon (either a green check, a yellow triangle or a red circle with an X in it). These icons represent the page’s SEO level. Green is good. To see suggested SEO improvements for the yellow and red icons, click on the page title.
For more on page performance, check out this HubSpot Academy user guide.
Track Keywords
Again, click on Reports in HubSpot, but this time select Keywords.
Here’s where you add keywords into HubSpot that you want to rank for. Similar to the Google AdWords keyword planner, HubSpot’s keyword report will tell you the monthly searches, estimated cost per click and difficulty of ranking for each term.
The HubSpot analytics code on your site will pull into this report the number of visits to your site for each keyword, where your site ranks for each term and more.
You can connect keywords to campaigns and track them here, you can see the contacts generated from each search term, and you can even see how your competitors rank for specific keywords.
Here’s more on how to use the keywords dashboard.
That’ll Keep You Busy Till Next Time!
Enjoy setting up your HubSpot analytics on your WordPress websiteand diving into the data.
Analytics and its initial functions are just the beginning!
In the next post, we’ll discuss HubSpot and WordPress form integration to capture leads and get even more out of your HubSpot analytics.